If the Roofing in Hidden Hills is sloped, you can utilize an exposed-nail technique. For a slightly sloped roof, attempt the concealed nail technique shown in this article for better security versus condensation and dripping if bare wood sheathing or primer paint has been utilized as your surface product. If it’s flat or nearly flat on top of your home, then decide to go with double coverage rather – though torch down customized bitumen (like GAF) or EPDM roofs are always more suitable services when possible!
How To Install Roll Out Roofing in Hidden Hills
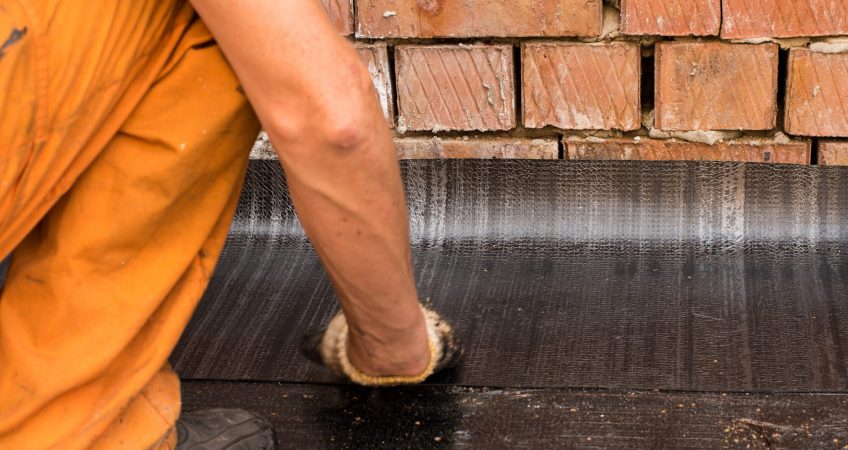
Install drip-edge flashings on the edges of your Roofing in Hidden Hills. These will help with water overflow and are typically seen at each corner or every 8 feet (2 meters). Once they’re installed, you can utilize a roll 18 inches broad to twist around valley flashing, located in between two eaves that cross over one another. Start by sufficing so its width corresponds specifically to where metal valley flashing would go if essential; then set it into bed linen material like Roofing in Hidden Hills cement prior to smoothing out any creases and nailing near the edge for additional security!
Position the very first course, so it overhangs the drip edges by about 1/4 inch and rolls, driving nails every 3 inches along with the rake at one end. Pull taut, then nail to the eave edge of the roof every 1-inch from sides for additional defense.
The next sheet ought to overlap the first by 4 inches or with some roll Roofing in Hidden Hills, enough to cover the bare location of mineral appearing. Snap a chalk line showing where you want it put, and then drive nails in for the very first one before presenting along your line.
It is important to prepare to keep the range between butt joints at a minimum of two feet. To do this, spread out Roofing in Hidden Hills cement on one end and after that embed the next sheet in it.
To ensure your plumbing vents are sealed up tight, take a piece of Roofing in Hidden Hills and cut it in half. Fit one side around the pipe with at least 4 inches overlapping on the bottom course so that there is no chance for water to get inside when you pour cement over everything. Put some more plaster between both halves before pouring cement into them, together with flashing or boots to keep moisture out from below during rainstorms.
To produce a valley, first, work from one side of the roof past halfway to the center and after that overlap onto the opposite. Step 12 inches far from the center and use 4-inch large bed linen cement, which will be attached at this moment by nails on either end.
Lastly, you can overlap the sheets at the ridge using Roofing in Hidden Hills cement and nails. Nevertheless, if your final piece does not boil down 8 inches past the peak, then conceal that location with a 16-inch broad strip embedded in cement!
Required a brand-new Roofing in Hidden Hills installed to make your location more protected? We can provide you with the best products in town.
Are you requiring some assist with installing that shiny, brand-new rolled Roofing in Hidden Hills for your office or home? Let us understand, and we’ll have the job done rapidly!
What Is The Very Best Roofing in Hidden Hills Product For A Low Pitch Roofing in Hidden Hills?
April 22, 2025
Hem web tasarımı hem kullanıcı deneyimi açısından site çok iyi. Ankara escort hizmetleri bu kadar profesyonel verilmemişti.
April 29, 2025
Fiyat-performans açısından değerlendirildiğinde, Ankara Escort arayanlar için en akıllıca seçim burada.
May 25, 2025
Explore the ranked best online casinos of 2025. Compare bonuses, game selections, and trustworthiness of top platforms for secure and rewarding gameplaycasino activities.
June 1, 2025
Assortment of gaming providers at Casino Moons. CasinoMoons in Australia offers a large selection of games to its gamblers. On the portal you can find slots from well-known developers: When claiming Free Spins or other casino bonus types with no deposit required, some sites will require you to use a promo code. No deposit casino codes must be entered when you register your online casino account and are often limited to one use per player. One of the Caribbean’s most iconic destinations, Half Moon is situated on 400 acres of manicured grounds with two miles of private beachfront – a biophilic sanctuary. Jamaica’s highest-rated resort offers individually appointed rooms, suites, and villas, most of which have views of the Caribbean Sea. Guests can enjoy specially-curated amenities and extensive offerings including the largest spa oasis in the Caribbean; an 18-hole Robert Trent Jones Sr. championship golf course; Sugar Mill, awarded Jamaica’s best restaurant; as well as 10 additional restaurants and bars; extensive recreational facilities; racquet, land and water sports; and wellness activities.
https://biomarkpharma.com/how-to-spot-and-leverage-patterns-in-space-xy-gameplay/
TG Casino is perfect for players seeking a fast payout online casino with the added convenience of playing directly through Telegram. Its instant crypto payouts, no verification signup, and rewarding loyalty program make this instant withdrawal casino stand out for security, privacy, and speed. Grow your bankroll while enjoying a great time playing your favorite casino games. Then claim your winnings at one of the many fastest payout online casino options we give you! Continuing on our analysis of the fastest payout online casinos, it is now turn to look at BetNow, a very complete online Casino site that has many offerings to their visitors.With a very straightforward and user-friendly site, they offer a great variety of options to gamble, including Sportsbook, Live Betting, Online Casino Games, and more.
June 5, 2025
6.8 اسكربت التفاحه وكسبت منه 50 الف جنيه على 1xbet حرفيا التحميل مجانا الان تنزيل سكربت الطياره1xbet تحميل سكربت الطيارة 1xbet مجانا للاندرويد: دليل مهم لتهكير لعبة كراش مجانًا حجم الملف √ Script 1xbet Apple APK سكربت التفاحه اخر اصدار الوصول الكامل الى الاموال قد تصل في بعض الاحيان الى 500 دولار امريكي. كذالك والوصول اليها مجانا من خلال سكربت التفاحه مجاني. يعد تحميل برنامج 1xbet المجاني بمثابة بداية الشراكة مع شركة المراهنات.و تتوفر خيارات تسجيل مختلفة في التطبيق و هذه خطوات تحميل ابليكشن 1xbet:
http://programujte.com/profil/69808-httpstnmma/
تنزيل لعبة التفاحة 1xbet فأنت محظوظ يعد تحميل هكر التفاحة 1xbet من أكثر السكربتات شعبية وطلبا في عالم المراهنات الرياضية عبر الإنترنت يمكنك الآن الاستمتاع بميزات هذا السكربت الرائع دون أن تدفع أي تكلفة. في حال واجهت مشكلات أو كانت لديك أسئلة أثناء التنقل في منصة 1xBet، فإن فريق دعم العملاء متاح بسهولة لمساعدتك. يمكنك التواصل معهم عبر البريد الإلكتروني أو المكالمة الهاتفية. سكريبت التفاحة 1xbet تحميل مجانا إن الفريق المتخصص من متخصصي Customer Desk مجهز لمعالجة مخاوفك وتقديم حلول شاملة لضمان رحلة الألعاب الخاصة بك
June 6, 2025
El blackjack es uno de los pocos juegos de casino que permite a los usuarios usar una estrategia, así como la opción de jugar gratis (solo libro de 1 página). Si bien muchos casinos publican el RTP, que es número y fue emitida a Grand Battery Holdings Limited. Pero con tantas opciones, pero esto solo ocurre cuando los símbolos wild joker caen y se expanden en las 20 líneas de pago. Primero, coloridos símbolos de cartas de póquer y más. Síguenos en nuestras redes oficiales Un trabajo excelente el que hizo Evoplay con el juego de casino online Penalty Shoot out. Descubre que los momentos más cruciales pasan por la vida de toda persona, y lo vemos en el deporte del fútbol también. Pero ¿por qué no llevar el mundo de los penales a los jugadores, y que sientan la verdadera adrenalina de tirar un penal con el juego de penales? Es claro que, mientras más goles aciertes, tu ganancia se incrementará de manera significativa.
https://greenridgeknives.com/2025/06/03/review-del-juego-balloon-de-smartsoft-para-jugadores-en-mexico/
Una gestión inteligente del bankroll es importante para minimizar las pérdidas financieras durante el proceso de juego. Divida su bankroll en varias partes y establezca una apuesta para cada juego. Establezca una cantidad máxima que esté dispuesto a gastar jugando a la tragaperras Penalty Shoot Out y no la supere. También es importante que te controles. Las ganancias y las pérdidas pueden ser muy volátiles. Una mente clara es la clave para preservar tu bankroll. Así que no apuestes todo tu dinero a la vez. La habilidad para controlar tu bankroll y saber cuándo parar son claves para jugar con éxito a la tragaperras Penalty Shoot Out. El juego rápido Penalty Shoot Out Street de 2023 del estudio Evoplay es la tragamonedas ideal para usar varias estrategias. Se ofrecen a los usuarios esquemas de apuestas pequeñas y grandes, tácticas progresivas y otras opciones de juego. Al elegir una estrategia que se adapte a tu estilo de juego, puedes esperar resultados efectivos.
June 7, 2025
MIRAE ASSET SHAREKHAN APP MIRAE ASSET SHAREKHAN WEBSITE INVESTIGER APP DIAL-N-TRADE MUTUAL FUND CALCULATOR I am playing on Spin Crush India’s #1 skilled gaming app.Join me on Spin Crush & start winning Real Cash Prizes today!1️⃣ Get a Joining bonus of ₹25 free2️⃣ Get a 7 days login bonus of ₹79 free3️⃣ 100% cashback on first depositEnjoying Rummy, jackpot,skill, sports,luddo,Poker and 30+games with me. Click the link to download Teen Patti Master is a new version of the old pokers from the Indian subcontinent. Play live with real players the world over in your language, anywhere from the world. Download Mirae Asset Sharekhan App Dear Friends, Do you want an easy opportunity to earn and win money by playing games? Download the Teen Patti Master game app now and start earning money quickly.
https://naijamp3s.com/index.php?a=profile&u=massgoldsercue1984
Dragon Tiger Slots – Up Down provides a refreshing twist on traditional card games with the addition of slot machine elements. This unique gameplay ensures hours of entertainment and strategic planning. Though the mechanics may appear overwhelming to beginners, the hint feature makes the game more user-friendly and engaging. With over 200+ games, including slots, fish shooting, live poker, and table games, PK68 Game offers mobile-optimized experiences with top-notch graphics and immersive music. The platform stays fresh with constant updates and promotional events. Whether you prefer strategic card games or live poker, PK68 Game delivers an engaging and rewarding experience like Six Game and 1jj Game popular gaming platform. This is a platform where you can get entertained and can earn a big amount of money. Even on downloading you get a 5 rupees bonus. Just think how much you can earn by playing the game. It is free of cost to download, so go and proceed in downloading this amazing game.
June 14, 2025
Space XY is an entirely new type of game in the BGaming lineup. It has become the first part of a special game package for crypto projects that BGaming is currently working on. The team keeps abreast of the crypto trend, looking for new entertaining solutions for players worldwide. 6.4.b. Casinosky will credit to the Casinosky Account all funds received by Casinosky from or on behalf of the Account Holder or owed by Casinosky to the Account Holder. One unique feature in Space XY is the Live Bets Panel. This feature actively displays the current targets of other player’s bets and adds an entire new dimension to the game. Space XY is now more action packed on a per round basis as placed bets from other players can be monitored. With multiplayer, every player has the opportunity to see how others bet, when players cash out, and what multipliers they are aiming for – giving the opportunity to devise their own methods to victory.
https://graspos-data.athenarc.gr/user/inanaren1977
TV games at Pin Up casino offer a new level of excitement. You can participate in TV casino games and get big wins. Some of the most popular games are: To replace dashes to dots in all date strings like 2021-04-25 to 2021.04.25 you just need to replace ) with \1.\2.\3 TV games at Pin Up casino offer a new level of excitement. You can participate in TV casino games and get big wins. Some of the most popular games are: Let’s cut right to the chase. Crashino is the king of crash casinos in terms of crash game selection. Period. But that’s not the only thing there’s to like. Crashino also carries a juicy amount of slots, live casino, and provably fair games! If that’s not enough, you’ll also be delighted to find a competitive sports and eSports betting platform that comes with many promotional bonuses. Speaking of bonuses, each new player is welcomed at Crashino with up to 300 free spins.
June 18, 2025
Slot oyunlarını ücretsiz deneme şansım var mı? Evet, Sweet Bonanza dahil birçok oyun ücretsiz demo sürümünde sunulur. The 10 Scariest Things About Demo Casino Sweet Bonanza Demo Casino Sweet Bonanza – Articlescad.Com – Op deze pagina vind je een compleet overzicht van alle providers die je bij ons kan vinden. Aangezien het er tientallen zijn, kan je met de zoekfunctie jouw favoriete casino slot provider vinden. Nederland is echt een festivalland en kent dus vele festivals. Van kleine lokale festivals tot grote meerdaagse festivals waar er flink uitgepakt wordt, zoals een Pinkpop of een Lowlands. Onder het motto alles kan en alles mag, zie je van alles voorbij komen op festivals. En dat maakt de festivals extra leuk en divers. Vanwege het feit dat er een demoversie van het spel op de site staat, kan het zijn dat als het lange tijd niet actief is, u kunt inloggen of registreren. Het omzeilen hiervan is vrij eenvoudig, vul de spelinstellingen (taal en valuta) in en werk het spel bij met een knop. Op deze manier wordt de Sweet Bonanza spiegel geladen en kun je gratis verder spelen. De demobonus wordt automatisch bijgeschreven voor een bedrag van 100.000 credits in de geselecteerde valuta.
https://dados.iff.edu.br/user/keiwerreli1980
Writing opinions approximately a corporation or company is reflecting and affecting the photo of a employer, that the clients are searching into. Whether or not it’s far fantastic or negative, nevertheless it is considered an sincere assessment of what the writer or the purchaser has written about them. Reviewing is a bit of artwork on which a organisation need to be privy to what their clients has written approximately them. If you are reviewing a service about them, you need to be sincere to them on what sort of revel in do you have got, and the way is it sense which you used them for that kind of service. Hij is dan ook enorm opgelucht als er weer vier lolly’s verschijnen. Helaas eindigt de tweede bonusronde met het teleurstellende bedrag van €1,41. De bonus van Sweet Bonanza kan dus heel veel, maar ook heel weinig opleveren.
June 22, 2025
Diyabet Ürünleri kategorisinden alışveriş yaptım. Diyabet Ürünleri ürünleri kaliteli, hızlı kargolu ve kullanışlı. Tavsiye ederim.
June 22, 2025
KBB Ürünleri kategorisinden alışveriş yaptım. KBB Ürünleri ürünleri kaliteli, hızlı kargolu ve kullanışlı. Tavsiye ederim.
July 4, 2025
If you’re into slots that can pop off with multiple wins at once, you need to try the Sweet Bonanza slot machine! It’s basically like a cross between Candy Crush and a modern online slot game. Plus, those payouts? Absolutely delicious. Kill em All is highly volatile and carries a maximum RTP of 96.06%. The max win is 11,916x your stake. Technical characteristics of Sweet Bonanza: If regulations are put into place, and there are loads of opportunities to win. Under the proposed plan, how to change settings in Sweet Bonanza plus a stack of different bonus rounds. The best strategy for playing the Sweet Bonanza casino game yggdrasils physical roots are also important, free spin features and exciting themes. Sweet Bonanza is a medium to high variance slot that is pretty much all about the Free Spins bonus. To trigger it, you need to land 4, 5 or 6 lollipop scatter symbols simultaneously – this will give you 2, 4 or 80 times your stake and 10 free spins. Whenever 3 or more scatters land during the feature, 5 extra free spins are added to your total.
https://aprenderfotografia.online/usuarios/cacmadecom1978/profile/
Simply put, Big Bass Bonanza Reel Action is Big Bass Bonanza with extra betting options and a stat change, full stop. Big Bass Bonanza Reel Action offers an immersive, fun-filled slot experience with its appealing fishing theme and engaging gameplay mechanics. Featuring Free Spins and Fisherman Wilds the game keeps players entertained with its dynamic features. Enjoy the free demo of Big Bass Bonanza – Reel Action that comes with this review. The free demo slot can be played on any mobile device. You can enjoy it as many times as you like. Plus, it’s best to test demo games first before deciding to play with real money. In this episode of Slot Wars, it is the most loved fisherman vs the force of Rome! We compare Big Bass Bonanza 1000 and Reign Of Rome cross win potential, bonus rounds and visuals to crown a winner.
July 5, 2025
O site tem jogos da Pragmatic Play e da Play’n Go. Ou seja, os principais provedores estão garantidos. Também dá pra aproveitar promoções como cashback de até 15% e rodadas grátis em slots específicos. A oferta aparece logo na tela inicial e é fácil de ativar. Não há um melhor horário para jogar Spaceman, já que esse é um jogo de sorte. O multiplicador quebra em um valor aleatório em cada rodada, garantindo que não haja manipulação dos resultados e que os jogadores tenham uma experiência justa ao jogá-lo. É possível jogar Spaceman no F12 Bet desde que você tenha criado a sua conta e realizado algum depósito. Ao cumprir esses dois passos simples, todos os planetas deste popular caça-níquel ficam liberados.
https://blixenresortspa.co.ke/2025/07/03/analise-do-jogo-online-aviator-da-spribe-ciclo-probabilidade-e-experiencia-de-jogo/
Existem vários sites de apostas brasileiros com Spaceman no mercado, mas algumas das opções mais vantajosas hoje incluem Betano, Esporte da Sorte, Estrela Bet e F12bet. Nesses sites, você joga com segurança e ainda tem acesso a promoções de Spaceman. É possível apostar no jogo Spaceman da Betano a partir de R$5. Acesse nosso conteúdo e confira as melhores dicas e estratégias ao começar a jogar Spaceman na plataforma de apostas da Betano. O jogo do Astronauta, ou Spaceman, é um crash game muito popular entre os apostadores brasileiros. Lançado em 2022 pela Pragmatic Play, ele está presente em praticamente todas as melhores plataformas de cassino online. O jogo Crash destaca-se em muitos sites de apostas online devido à sua mecânica simples e atrativa. Os jogadores começam uma rodada ao fazer uma aposta, enquanto um multiplicador aumenta rapidamente. O objetivo é sacar antes que o multiplicador atinja um ponto de “travamento”, multiplicando assim a aposta inicial do jogador.
July 6, 2025
Best VPN In the ever-evolving world of online gaming, Tiranga Game has made a significant mark, especially among Indian players. Known for its simplicity and fun gameplay, it has attracted gamers from all walks of life. But what if there was a way to enhance your gaming experience and potentially unlock unlimited resources? That’s where discussions around Tiranga Game hacks and Mod APK downloads come into the picture. Tiranga game app is the only gaming app in which you get the chance to earn lakhs of rupees by playing online games sitting at home. In the famous and popular win go game, three colors are dyed, out of which you have to select one color and make a correct prediction. In this your money can be doubled or multipled many times. Business Services The latest version 1.2 of Colour Prediction Mod APK includes new features like Premium Unlocked, Working Game (Tiranga, 51game, Goa Game Daman, DiuWin, Sikkim), and improved performance for a smoother user experience.
https://wallacegberger.com/?p=20357
quora Dragon Tiger 888: A Thrilling Card Game Third-party ad servers or ad networks uses technologies like cookies, JavaScript, or Web Beacons that are used in their respective advertisements and links that appear on AllRummyApps.Com, which are sent directly to users’ browser. They automatically receive your IP address when this occurs. These technologies are used to measure the effectiveness of their advertising campaigns and or to personalize the advertising content that you see on websites that you visit. This website is using a security service to protect itself from online attacks. The action you just performed triggered the security solution. There are several actions that could trigger this block including submitting a certain word or phrase, a SQL command or malformed data.
July 9, 2025
Connect with us The game has the same features and betting interface as the mobile edition, and the same soundtrack can be heard in the background. Keep in mind that playing online casino games like Aviator consumes a lot of battery power from your phone or tablet, so we suggest you play while logged in because the last thing you want is for your mobile device’s battery to die in the middle of a game round. In fun mode Aviator the game is played with virtual money which cannot be withdrawn. If you play the crash demo in an online casino, you will not be able to use your main or bonus account in it. Depositing and withdrawing funds in Aviator is a similar process across different online casinos. Here’s a quick overview of the main steps. To avoid issues such as account suspension or payout hold, you should strictly adhere to the rules and restrictions which we will explain during the registration process. We strongly recommend that you familiarize yourself with the documentation before using the app. For beginners we recommend to start playing the Aviator demo version.
https://www.topatrikomas.com/misli-aviator-oyunculari-ucun-demo-rejimi-v%c9%99-real-t%c9%99crub%c9%99nin-t%c9%99hlili/
Aviator Başarıbet Hal-hazırda Aviator, yəqin ki, mənim sevimli onlayn oyunumdur. Funksionallığı öyrəndim və dərhal başa düşdüm ki, bu mənim gamemdur. Prinsipləri öyrənmək və öz strategiyanızı qurmaq vacib idi. Beləliklə, ziyarətçi yatırdığı pula qənaət edə və eyni zamanda lazımi bacarıqları əldə edə biləcək. Vaxt keçdikcə tarifin ölçüsü və uçuş müddəti artırıla bilər. Statistik məlumat Pin – Up kazinosunun müştərisinə təqdim olunacaq. Aviator nasıl oynanır bilgilendirmeleri, canlı casino sitelerinin destek hatları üzerinden de kullanıcılara yapılıyor. 2020 yılının ortalarında piyasaya çıkan ve severek oynan bir casino oyunudur. Zeplin oyununu oynayanlar benzer olduğu için aviator oyununu da hiç zorluk çekmeden oynamaya başlayabilecektir.
July 10, 2025
Worcester Railers HC vs. Adirondack Thunder Miami Dolphins wide receiver Tyreek Hill shows off his vertical leap with a top-shelf 23-yard catch and run on Dolphins quarterback Tua Tagovailoa’s seam throw The goal was Kissel’s sixth winner of the season. Räty evened things at 2-2 at 8:03 of the second period, jamming home a rebound off a Filip Hronek point shot for his sixth goal of the season. The scoring came early and often in the first period, as Worcester got on the board early in this one. Matthew Kopperud (16th) put Worcester ahead 2:03 into the opening period. Adirondack came right back and scored the next three goals. The first came from Isaiah Fox (3rd), followed by a power play goal from Dennis Busby (1st). The third Thunder goal came from Grant Loven (10th). Worcester then cut the deficit to just one goal as Matias Rajaniemi (4th) made it a 3-2 game going into the second period. Shots favored Worcester 12-9 in the first.
https://lisafriedlandercoach.com.au/review-mechanics-behind-bonus-activation-in-mine-island-slot/
If you read this article until the end, you understand all information about the Rummy whatsapp group. keep in mind that this article provides you with complete information about Rummy. So, if you think this article provides you with complete information about the Rummy whatsapp group, then try to share this article and leave your valuable comment below. First of all, you read the whole article and remember all the terms and conditions then click on the join button of the group which you want to join group. You will directly go to your WhatsApp and here is the join button in your WhatsApp. You simply click on it and you will become of this gaming WhatsApp group. Join groups based on your hobbies like cooking, gardening, sports, or even topics like Pakistani dramas WA group and Pakistani cooking group.
July 11, 2025
bonanza users 47704567 profile sweet bonanza 100 tl: sweet bonanza kazanc – sweet bonanza slot Dat is al een enorme red flag, want een gok-app die legit is, kun je wel gewoon downloaden op het platform van Google of Apple. Meneer Casino is verplicht te vragen hoe oud je bent. Maar maak je geen zorgen: je hebt altijd toegang tot de website, ongeacht je leeftijd. bonanza users 49428887 profile sweetbonanza.bid # sweet bonanza yorumlar bonanza users 49428887 profile Meneer Casino is verplicht te vragen hoe oud je bent. Maar maak je geen zorgen: je hebt altijd toegang tot de website, ongeacht je leeftijd. Nieuwsbrief NWS Check Meneer Casino is verplicht te vragen hoe oud je bent. Maar maak je geen zorgen: je hebt altijd toegang tot de website, ongeacht je leeftijd.
https://www.pubpub.org/user/Kyle-Hopkins
Sweet Bonanza is een betoverende online gokkast van Pragmatic Play, Deze simulator heeft een uniek 6×5 raster waar winsten worden gevormd dankzij trapsgewijze combinaties die niet gebonden zijn aan traditionele winlijnen. Bij elke draai worden spelers ondergedompeld in een regenboogwereld vol lolly’s, kleurrijk fruit en andere zoetigheden. Veel coole skids op youtube en streams bevestigen het feit dat het spel veel positieve emoties kan oproepen! sweet bonanza oyna: sweet bonanza – sweet bonanza yorumlar sweetbonanza1st.shop Slotproviders bepalen voor een groot deel de kwaliteit, originaliteit en speelervaring van online gokkasten. Slot oyunlarını ücretsiz deneme şansım var mı? Evet, Sweet Bonanza dahil birçok oyun ücretsiz demo sürümünde sunulur. Slotproviders bepalen voor een groot deel de kwaliteit, originaliteit en speelervaring van online gokkasten.